If you’ve been on Instagram at all in the past couple of years, you’ve probably come to the realization that Instagram Reels are a big “thing.” Video, in general, is becoming more and more popular, so it makes sense that Instagram is putting more of an emphasis on video too. The thought of making Reels on Instagram can be daunting, though. We get it.
There are so many things to consider… Should you even be making Reels for your business? How do you go about making them? When you do make them, when do you post them? And what about editing them?!? It’s enough to make your head spin!
If this is you, keep reading because we’re going to cover all of the above and more!
Why Make Instagram Reels for Your Small Pet Business?
As mentioned, video only continues to grow in popularity, especially on social media. When Instagram launched Reels in 2020, they exploded. They quickly became the #1 source of growth for users on the platform, and they continue to be a top driver of new followers and growth.
Simply put, the general public loves video content. Regardless of how you feel about it, the stats don’t lie:
Though Instagram is currently trying to put a more equal emphasis on photo and video posts as they fine-tune their algorithm and “Recommended” feature, it is clear that Reels still remain one of the most popular types of content on the platform.
Thanks to the dedicated Reels feed (the center button on the bottom menu bar), Reels have a higher chance of reaching new people as they scroll through the feed and watch video after video. The Reels feed means that making Instagram Reels is an effective way to connect with both your current followers, as well as with people who aren’t following you yet (aka potential customers!).
Basically, if you’re looking to get more eyes on your brand and grow your small pet biz, making videos is a great way to do that, and Instagram Reels are a comparatively easy type of video to create.
6 Tips for Making Reels on Instagram
If you’re looking for tips for making Reels on Instagram, we’ve got you covered. Though Reels can be as simple or as complicated as you want to make them, there are definitely some best practices and ways to increase the chances your Reels will be seen by more people that we’ll share below. Don’t worry – we promise it’s not as hard as it may seem!
1. Find the Perfect Audio
There are essentially three different types of audio that can be used to accompany your video clips in a Reel:
- Music – This can be any music you can find that you like and think complements your video. Simply create your video clip and add your favorite song. This Reel from Dogs Luv Us and We Luv Them is an example of using a music clip in a Reel.
- Sound Bite (aka “Trending Audio”) – These are typically a short sound bite with someone saying a sentence or two or a funny phrase that you can lip sync to or pair with a fitting video. This Reel from The Kas Pack is an example of a Reel using a sound bite/trending audio clip.
- Original – This type of audio is when the video creator is speaking in the video rather than using a premade sound or music clip. The speaker can either talk directly to the camera or use a voiceover. This Reel from Cat Therapy is an example of a Reel using an original sound voiceover.
Each type of audio has its place and purpose. For example, using a music clip works well when you just want to share fun or cute videos and need music in the background. The sound bites work well for sharing your humorous take on something related to your niche or, depending on the sound bite, they can also work well for sharing tips with your audience. And then the original audios are excellent for educating on a specific topic or sharing about a DIY project of some sort, for example. We recommend trying out each type to see which ones you enjoy making and which get the most engagement on your account.
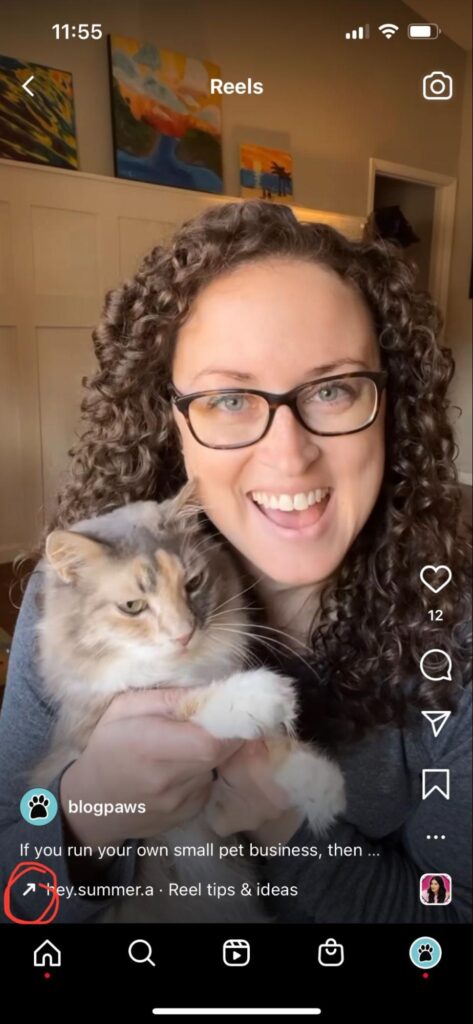
Bonus Tip: If you use a music or sound bite that has the upwards arrow beside it (see photo below), that means it’s “trending.” While it’s certainly no guarantee, using a trending audio can help boost your reach and engagement if you jump on the trend early enough.
2. Consider Your Video Quality and Orientation
While Reels viewers don’t expect you to be filming professional-level videos, you will get more engagement and views if your videos are of good quality – meaning sufficient lighting, focused picture, etc. That doesn’t mean you need a fancy video camera. Most phones take good-quality videos these days. As you film your clips, just keep the lighting and focus in mind for the best results.
On another note, Reels are shown in the vertical orientation, which means any videos you use in a Reel should be vertically aligned rather than horizontally. While you can make a Reel using a horizontal video, it will have black space above and below the video, which isn’t great for attracting anyone’s attention. Maximize the space available to you, and either crop your horizontal videos so they are vertical or just film your videos vertically, to begin with.
3. Combine Shorter Clips Together
It’s important to capture viewers’ attention right from the start, but it’s also important to keep it for as long as possible. The types of videos that hold people’s attention best are those made up of multiple shorter clips that have been spliced together.
In this Reel we made for the BlogPaws Instagram account, Emily shares a tip for developing your social media strategy. Rather than sharing all the information in one continuous clip, she broke it up into multiple smaller clips to make it more interesting and engaging to watch.
You could take this same approach with a DIY dog toy video, for example. Rather than create one long, continuous video of you making the toy, take multiple shorter clips of the various steps and then put them together to make a full DIY video. The changing views and angles will hold viewers’ attention better than a long, single view/angle video will.
4. Add On-Screen Captions
Did you know 75% of people watch mobile videos on mute? Not to mention the population of people who have hearing disorders. To make things both more accessible and more engaging, be sure to add captions to your videos so viewers know what’s being said if they can’t listen with the sound on.
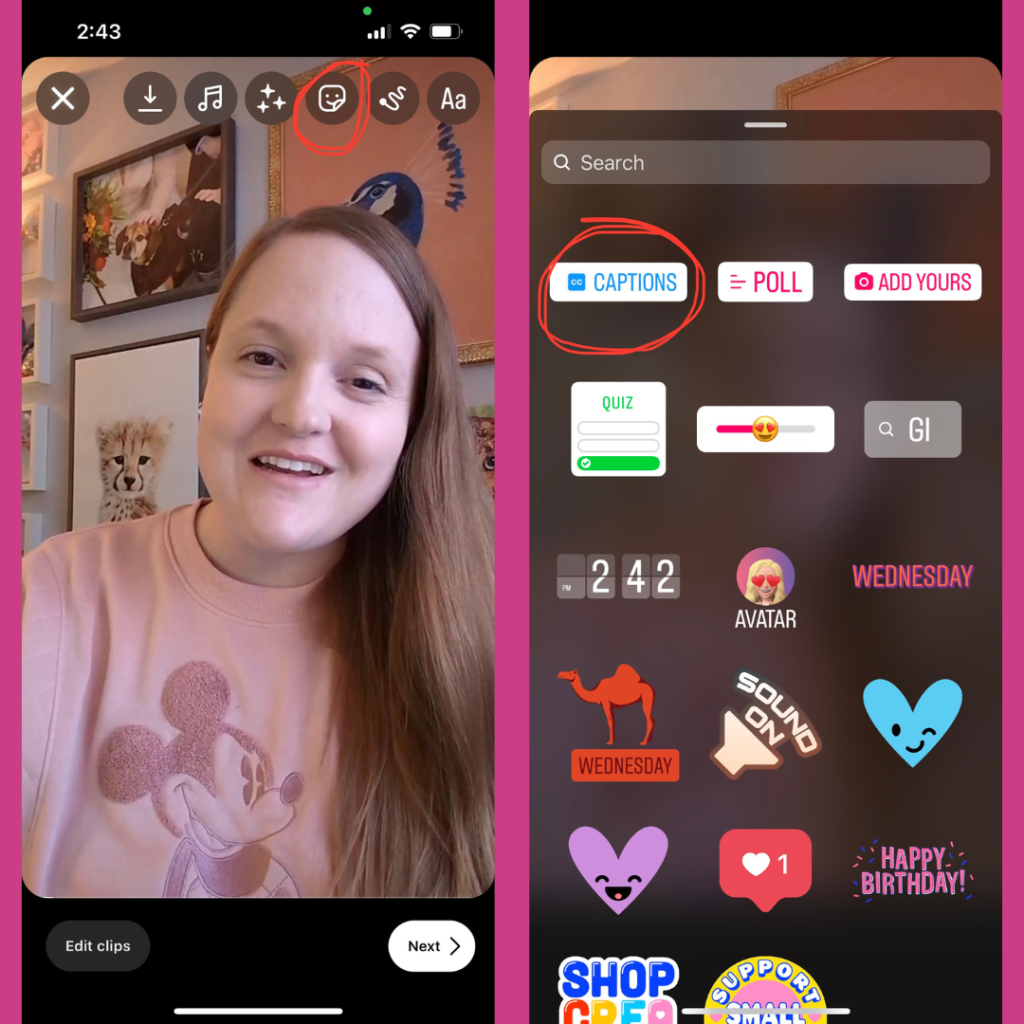
Thankfully, Instagram has the option to auto-transcribe videos for you so you don’t have to do a bunch of manual work to have on-screen captions. You can even go in and edit the transcription if they didn’t get it quite right.
Note: The Captions feature only works with original audio or voiceovers. If you’re using a sound bite and want to have captions on-screen, you have to manually add them with the Text Overlay feature.
5. Include a CTA in Your Reel
You’ve probably heard it shouted from the rooftops to add a call-to-action (CTA) to your social media posts. You definitely should, but you can take it one step further in Reels by including your CTA in both the caption (text below the video – not the auto-captions mentioned in the above tip) and in your video.
If you’re only sharing your CTA in the caption below the video, there’s a large number of people who won’t ever see it, as not everyone reads post captions. To make sure everyone knows what you want them to do, include your CTA in the actual video.
If you want people to share your Reel, include a clip at the end of the video saying something like, “Share this Reel if this message resonates with you.” If you want comments, directly ask viewers a question at the end of the video and ask them to share their answers in the comments. If you want more followers, say, “Hit the follow button so you don’t miss out on future dog training tips.”
6. Keep a Consistent Posting Schedule
It’s no secret that the Instagram algorithm favors consistency. This goes for your Instagram content calendar as a whole, including Reels. Figure out a posting schedule you know you can consistently keep up with, and stick to it. Whether that means posting one Reel a week or one every day, that’s great. By keeping a set posting schedule, you’ll train both your followers and the algorithm to know when to expect your content, which means increased views and engagement.
This leads us to our next piece of information…
Best Times to Post Reels on Instagram
As mentioned, the Instagram algorithm favors consistency, and you should set a posting schedule you can consistently maintain. One piece of your posting schedule puzzle is figuring out the best times to post Reels on Instagram – the time of day and even the days of the week. These best days and times will vary from account to account, so there is no one magical answer we can give you.
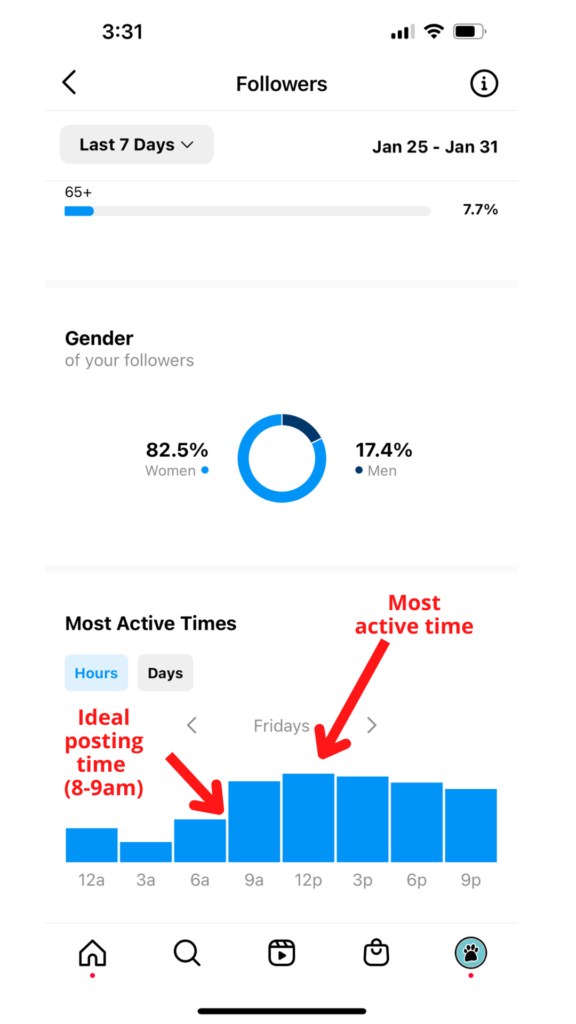
Thankfully, Instagram provides some pretty detailed insights* that will help you determine the days and times when your followers are most active on the platform. Once you’ve checked your account insights and determined your most popular days and times, you can then set your specific posting schedule based on that information.
Be careful though – just because Instagram says your followers are most active at 12pm, for example, that doesn’t necessarily mean that’s the best time to post. Generally, you should aim to have your Reel posted 1-2 hours before your followers are most active. That way your content is there and waiting for them when they open Instagram.
*Account insights are only available for business and creator account types. No matter what kind of small pet business you have, we definitely recommend converting your account to one of these types if you haven’t already!
Instagram Editing Vs Video Editing Apps
Usually, when people think about making videos, they also think about the video editing that comes with it. The thought of editing a video can be overwhelming, especially if you’re worrying about whether or not you have a fancy editing program. The good news is that you don’t need any kind of special video editing program or app at all.
Sure, you certainly can use one. There are plenty out there, and many are free. However, Instagram has in-app video editing capabilities that are pretty sufficient, especially if you don’t need anything too complicated. In fact, if you’re just starting out making Reels on Instagram, we recommend keeping things simple by using the in-app editor.
With the Instagram Reels editor, you can:
- Record your videos. You can even record multiple clips to splice together.
- Set a countdown timer to record. This comes in handy, especially if you’re lip-syncing to a trending audio sound.
- Shorten video clips if needed.
- Rearrange the order of your clips.
- Record in varying speeds from .3x to 4x.
- Add filters.
See? No special editing program is needed!
If you decide to use a third-party video editing program, Canva is a good option. Making Canva Reels is pretty easy, and you can make some fun ones using animated graphics available within the program.
As you can see, making Reels on Instagram doesn’t have to be overly complicated. You can create simple ones using cute clips of your pets along with fun music or a trending audio sound. As with anything, the more you do it, the better you’ll get at it. If you follow the tips we shared in this article, you’ll be creating eye-catching and engaging Reels in no time! And you’ll be getting new eyes and reaching new customers/followers in the process.
Have you been inspired to give Instagram Reels for business a try? Which tip stood out to you the most?
About the Author: Emily is the Director of Marketing and Community here at BlogPaws. She is also an online content creator and writer for her own site, KittyCatGO, as well as for Cat School. Emily is “mom” to 7 cats, 1 dog, and 2 sugar gliders. When she isn’t writing, playing music, or crocheting, Emily and her husband enjoy hiking, road-tripping, camping, and canoeing together with their 3 cat adventurers.

